
Instant Object Replacements Made Easy with insMind AI Replace
While AI replace can revolutionize how you edit your photos, do you find it sometimes difficult to remove or switch out objects in your picture? Perhaps you want to enhance a scene or eliminate distractions to focus on a more important subject.
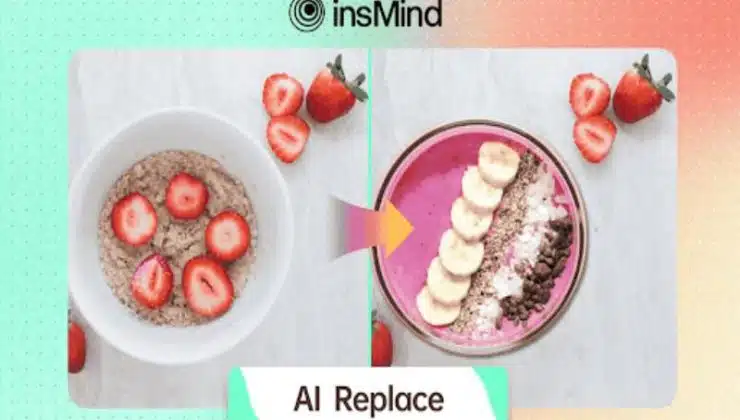
Sometimes, traditional editing methods appear too complicated and require too much time to be applied gradually. Luckily, InsMind’s AI Replace feature makes all these tasks much easier. In the following article, we will guide you step-by-step on how to utilize this helpful tool to erase and replace elements in your photos.
By the end, you’ll know how to enhance images in a few clicks and make photo editing seem like a breeze.
So, let’s get started.
Understanding AI Replace
Before learning how to use erase and replace AI tools, it’s essential first to understand what these tools are.
Well, it all began with the early stimulus of artificial intelligence back in the mid-20th century. When computers were significantly enhanced in terms of performance and image analysis capabilities, machine learning finally enabled them to manipulate images even more effectively.
AI replacement art tools are significantly better now than they were in the past. They began making simple edits, such as cropping and color correction. Now, they can remove objects from images and replace them. These tools can analyze the image and fill in the gaps naturally once an object has been removed from it.
Nowadays, AI replacement tools are in demand, starting from photography and graphic design to marketing, they will enable a user to enhance an image in minutes. It will be easy to create great visuals for social media, a website, or print.
Thanks to this AI-powered tool, even amateur users can create professional-looking results in just a few clicks. Knowing these tools will finally let you unleash their full potential with your projects.
Key Features of AI Replace with insMind
InsMind is powered by AI for easier photo editing icluding AI erase and replace. You can remove or replace an object in your image quite easily using this platform; hence, it will be very ideal for photographers, graphic designers, and others who want to add more character to their images.
Equipped with relief on the front line and ease of use, insMind enables users to achieve professional results quickly, even with minimal editing experience.
Key Features:
- Object Detection Intelligence: Smart algorithms by InsMind can detect and isolate objects in your photos with high precision.
- Seamless Background Filling: The tool instantly fills in the background where an object has been removed, creating a natural appearance.
- Versatile Replacement Options: Users can select from a wide range of objects and elements to replace unwanted elements in their images.
- User-Friendly Interface: InsMind’s lightweight and straightforward design enables users of all levels to work with it easily.
How to Use AI Replace Effectively Using insMind?
Using insMind’s AI Replace feature is simple. Follow these steps to edit your photos effectively:
Step 1: Access the tool page
Start by visiting the InsMind AI Replace tool page. Here, you’ll find everything you need to get started with your photo editing.
Step 2: Upload your photo
Once on the page, look for the upload button. Tap it to select and upload the photo you want to edit from your device. For best results, choose a high-resolution photo where the objects you want to replace are clearly visible.
Step 3: Replace your photo
Once you’ve uploaded your photo, it is automatically analyzed by the AI. Then, tap the brush and select the object that needs removal. After that, simply instruct the AI to replace it with whatever you want, and it will perform the replacement for you. It allows you to set up the size and position to fit perfectly in the image.
Step 4: Download
Click the download button once you are satisfied with the modifications, and then save your edited image on a device. Now, your photo is ready for use, showing the new object you added!
Just a few simple steps to make your photos look even better using the feature AI erase and replace by InsMind.
Best Practices for Optimal Results
To achieve the best results when using the AI Replace feature in insMind, keep these best practices in mind:
High-Resolution Images:
Always edit from high-resolution images to have the best clarity and detail. High-resolution photos give AI a better way of detecting and replacing objects in pictures in great detail since the quality is high.
In cases where low resolution is used, the final results may exhibit blurriness or pixelation lines, which can compromise the overall appearance of the image. Clearer and more detailed images enhance the effectiveness of the AI replace feature, and they also lend a professional look to your final product.
Mind the Context
Always replace objects in your photos, considering the context in which those elements will be placed among other surrounding objects. For example, if you’re changing something in a sunny scene, then you can make sure that the new object fits the brightness of the scene to match the overall mood.
A context mismatch may make something jump out and not be as believable of an edit. These kinds of details will help your photo still look natural and more aesthetically beautiful.
Consistent Style
Try to maintain a consistent style across the images. When replacing full objects, ensure that colors, textures, and other design elements are consistent across the image. When replacing furniture in room scenes, for example, ensure that the additional pieces of furniture will complement the existing room in terms of style and color scheme.
Consistency allows you to achieve a professional look that will make your images cohesive in the end. This is especially true when it comes to marketing materials or social media posts, where visual cohesion can really help project an image for your brand.
Preview Before Finalizing
Always save and take a moment to review your edit in preview mode before downloading the final image. This is quite important, as it shows how well your new object integrates with the rest of the photo, particularly in terms of its lighting, shadows, and alignment with the object.
Sometimes, certain things that looked perfect in the editing phase don’t look quite right when you view them in the fullness of the image. You will be able to make the necessary adjustments upon carefully reviewing your work and ensuring that your final result is polished to your liking.
Experiment and Practice
You can experiment with objects and context by applying different replacements and adjustments to achieve an optimal replacement result tailored to your specific images. The more you work with it, the better you will understand how the tool works and how to achieve your goals.
That, in turn, will give you more editing skills and self-confidence while working with the tool. Also, remember that the appropriate fit often requires trial and error, so go ahead and experiment with it until you find the perfect fit for your images.
Conclusion
In conclusion, InsMind’s AI Replace feature can change the way you edit your photos. Unwanted items are easily removed and the enhancements of the images are done with smart object detection and seamless background filling. The best practices listed in this article will help make the changes look professional and natural.
Ready to enhance your photo editing skills? Try InsMind’s AI object replacer today! See for yourself just how effortless it is to create stunning images that catch the eye.